
Gateway Laptop Schematics Diagram. Service Manual PDF
Disassembly, diagrams and service manual for laptop Gateway 200, 400, 450, 450RGH, 450ROG, 600, gateway 6000, 6100, 6500, 6600 Diagrams for laptop Gateway CX200, CX2000
Diagram Gateway nv42, nv53, nv59, nv59c, nx500 Service manual
Gateway Profile 4 Profile 5, p78, p79
Gateway Solo 1100, 1150, 1200, 1400, Solo 1450, 3350, 5000, 5100, 5300, 5350, 9500, 9550 service manual
Disassembly, diagrams for Gateway S-7200 laptop
Part-list, diagrams, service instructions for laptop Gateway TA1, TA6, TA7
detailed disassembly of the Gateway M255-E laptop. (Replacement of power connector, repair, replacement of motherboard)
Gateway 450ROG - Service manuals and diagrams Download
Gateway NX560XL Service manuals and diagrams Download
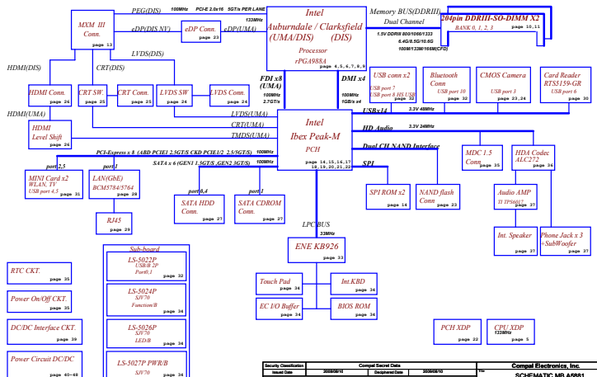
Gateway NV79 NV7915U NV7928U Compal LA-5881P Rev:0.1 Schematic Download
Gateway NV59C Compal LA-5893P Rev:1.0 Schematic Download
Gateway NV59C Compal LA-5892P Rev:C Schematic Download
Gateway NV59C Compal LA-5891P Rev:1.0 Schematic Download
Gateway NV77H Compal LA-6911P Rev:0.3 Schematic Download
Gateway NV57H Compal LA-6901P Rev:2.0 Schematic Download
Gateway NV55S Compal LA-6973P Rev:1.0 Schematic Diagram Download
Gateway NV53A PEW76 LA-6552P Schematic Download
Gateway NV53 Wistron SJV50-TR 09228-1 48.4FM01.011 Rev:1M Schematic Download
Gateway NV52 Wistron SJV50-PU 08260-1 48.4BX04.011 Rev:1 Schematic Download
Gateway NV51M Compal LA-6631P Rev:1.0 Schematic Download
Gateway NV51B Compal LA-7092P Rev:1.0 Schematic Diagram Download
Gateway NV50A Compal LA-6552P Rev:1.0 Schematic Diagram Download
Gateway NV44/NV48 Quanta Z06 Rev:1A Schematic Diagram Download
Gateway NO51 Inventec BAD50/BXD50 Rev:A02 Schematic Download
Gateway MX8738/8711/8708 MP8708 Quanta PA6A Rev:2A Schematic Download
Gateway MX8715/8721m/8734/8739/8741 Quanta PA6 Rev:1A Schematic Download
Gateway MX6920/6931 MT6840/622b/6704 Quanta MA7 Rev:3A Schematic Download
Gateway MT6728/6730 ML6700/6720/6731 Quanta MA8 Rev:1A Schematic Download
Gateway MX6708 Quanta MA6 Rev:1A Schematic Download
Gateway MT6451/6485/6453 Quanta MA3F B2 STAGE Rev:1A Schematic Download
Gateway MX6437_6438_6453_6454_6448_6452 Quanta MA3 Rev:3B Schematic Download
Gateway MD2601U/MD2614U Quanta AJ6 Rev:1A Schematic Download
Gateway MC78 MD78 MD7801U MD7811U MD7818U MD7822U Quanta AJ2 Montevina Schematic Download
Gateway M-7301U M-7315U M-7317U Quanta SA6 Rev:3B Schematic Download
Gateway M465 Quanta MA6 Rev:1A Schematic Download
Gateway M1412 M1600 Quanta SA1A Rev:4A Schematic Download
Gateway ID58 Series Wistron SJM50-MV Rev:SA Schematic Download
Gateway ID57H P5LJ0 & P5LS0 Compal LA-7221P Rev:1.0 Schematic Download
GateWay ID49C04U ID49C11U NELA0 Compal LA-6151P Schematic Download
Gateway ID47H SJM40-HR Compal LA-241P Rev:0.2 Schematic Download
Gateway EC49C Inventec SJM40 DISCRETE-BGA Rev:X01 Schematic Download
Gateway ID43 ID43A NELA5 Compal LA-6141P Rev:1.0 Schematic Download
Gateway EC39C Wistron SJM30-CS Rev:2 Schematic Download
Gateway E-265M/475M Quanta NA1 Rev:2A Schematic Download
Gateway EC14/EC14D Compal LA-5631P Rev:0.4 Schematic Download
Gateway CX2755_E-295_S-7235R Quanta TA7 Rev:2A Schematic Download
Gateway CX210X_2720_2724_2735M_2608_2610 Quanta TA6 Rev:1A Schematic Download
Gateway Arima W350DI Rev:E Schematic Diagram Download
If you have diagrams that you are ready to share, send them to [email protected]
If you haven't found what you're looking for, write in the comments below.
Gateway P series laptop disassembly
This guide will cover how to disassemble a Gateway P-series laptop.
In this case, we will analyze the Gateway P-6825 laptop, but the manual should work for the entire P-serial line.
If this guide applies to any other Gateway model, please indicate the model in the comments to this article.
First of all, turn off your laptop, unplug the AC adapter, and remove the battery.
The main main components of the laptop can be accessed by removing two panels on the bottom.
There are five screws securing the fan/RAM cover and four screws securing the hard drive cover.
Under the fan/RAM cover you will see the memory modules (RAM), wireless card, fan and processor (mounted under the heatsink).
Removing this cover will give you the opportunity to replace the fan; if this is not necessary, you can simply clean the fan and heat sink. I suggest using compressed air for this purpose.
In addition, removing this cover gives you access to the memory modules and makes it very easy to replace/upgrade the memory.
Under the hard drive cover you will find two hard drive bays. In my case, I only had one hard drive installed.
To remove the hard drive, slide the entire hard drive assembly in the direction shown by the yellow arrow.
In my case, I had to use force because the hard drive was installed very tightly.
Once the hard drive assembly is removed, you can remove the four screws that secure the hard drive to the mounting cage. Now you can replace the hard drive with a new one.
Using a sharp tool, remove the rubber covering located on the right side of the hard drive bay.
This cover hides the screw holding the DVD drive in place; remove the screw.
You can now remove the DVD drive from your laptop and replace it if necessary.
The DVD drive has been removed.
In the next 10 steps, I explain how to remove the keyboard.
There is no need to go through all the previous steps to remove the keyboard.
Remove the two screws holding the power button cover to the battery compartment.
Gently lift up the right side of the power panel.
Continue lifting the "power" panel.
Be very careful. There are two cables connecting the power panel to the system board. Do not raise the panel too high.
In the following picture you can see two cables.
Try not to disconnect them from the power panel or system board. Ideally, these cables remain connected after you remove the panel.
Unscrew the five screws holding the keyboard.
You can now access the keyboard cable connection. Before you remove the keyboard, you must unlock the connector and disconnect the cable.
Alfredo Intriago (Friday, 08 August 2025 18:35)
Qué difícil encontrar el schematic de la motheboard E241819
Gateway GWNR17517-BL
Billy Johnson (Friday, 25 April 2025 15:12)
Please upload schematics for gateway laptop model gwtn156-7bl. Motherboard N14TBR110-TA60D
MAK (Sunday, 15 September 2024 18:23)
Please upload gateway P 7808u fx laptop schematic diagram.
Acer gateway (Tuesday, 10 September 2024 13:47)
Acer gateway ne46rs1 nbcr44-t810 somatic diagram
alonso (Tuesday, 23 July 2024 19:43)
no encuentro el diagrama de gateway gwtn 156-1bl